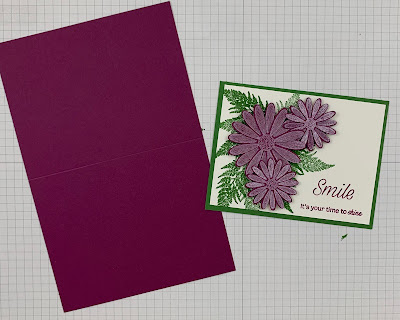
I have card #12 for you to see. I am really loving this challenge! It's really making my creative juices flow. It's been a really long time since I've crafted cards consistently like this. Honestly, I think a big part of it is my new craft room! I am loving it!! If you haven't seen my post about moving my craft room from a main floor bedroom to my basement family room, you can check it out HERE
But for now, here is the card for today. I'm using these supplies (a complete list, including measurements will be at the end of this post) …
I'm starting off with a scrap of Rich Razzleberry cardstock and Whisper White Craft Ink. I stamped 2 of the large daisies, and 4 of the smaller daisies. When you're stamping an image that's going to be punched out, you want to look at the direction of the punch and stamp near the edge of the cardstock. In this case, I stamped the daisies so the petals were positioned up and down. The Whisper White Craft Ink is a little thicker than the regular ink, so it does take a little longer to dry. After stamping, I set this aside and moved on to the next step …
Using the Whisper White cardstock and Rich Razzleberry ink, I stamped the sentiment. I lined up both stamps on one block before stamping to make it easier …
Then I used the Garden Green Ink and stamped the leaf in the upper left corner. Without inking again, I stamped it next to the first leaf making it a lighter color …
I continued stamping the leaf (twice to make the lighter color) around the left side of the cardstock, making sure the points of the leaf were facing outward …
Now that the ink on the daisies were dry, I used the punches to cut them out. It's easiest to turn the punch upside down and slide the paper in. That way you can see where it lines up …
When I was punching out the daisies, I realized that I only stamped 3 of the smaller ones! So, I squeezed in another daisy, fanned it to dry and punched it out …
I used Glue Dots to attach 2 daisies together, creating 2 fuller small daisies and 1 fuller large daisy …
I took my card front and played around with positioning the daisies. If you decide that you need more of the leaves, now is the time to stamp them …
Once I got the position I liked, I added a dimensional to the back of each flower and attached them to the card front …
I put adhesive on the back of the card front, and attached it to the Garden Green cardstock. Then I attached that to the Rich Razzleberry cardbase …
Since I'm using such a dark color for the cardbase, I attached a piece of Whisper White cardstock to the inside. You can leave it blank, or stamp a sentiment if you'd like (I left mine blank) …
And here's the completed card for today ...
If you would like to create this card, here's a list of all of the supplies I used. You can purchase any of these items on my Stampin' Up! website by clicking HERE
Thank you so much for stopping by! I hope you enjoyed this tutorial. As always, if you have any questions please don't hesitate to contact me.
xoxo
Dawn


No comments:
Post a Comment