Wednesday, January 26, 2022

New Color Street Launch

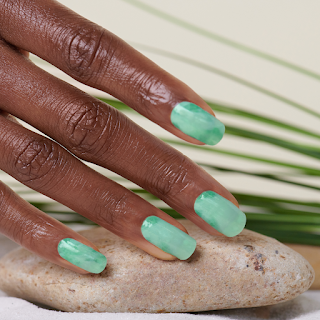
Six brand new shades of the Gem Fatale Collection has just been released!!! These limited-edition Color Street shades take the geode nail trend to the next level with vibrant colors and an array of finishes that mimic the natural beauty of semiprecious stones.

Meet these new gems ...

A Pyrite's Life - an eye-catching stone-textured black and gold design ...


Game of Stones - a silver-flecked azure agate design ...

Jadey Business - a serene shade inspired by jade stones ...

Out of Quartz - an amethyst-inspired design with mesmerizing holographic glitter ...

Pebble Rebel - a sweet marbled peachy-pink ...

Sorry Not Quarry - a rocking gold, brown and black glitter design ...

This is a limited edition collection - once they're gone they're gone! So get them while you can! Shop my website right HERE

As always, if you have ANY questions please don't hesitate to contact me

xoxo
Dawn


Wednesday, January 19, 2022

My Word of The Year 2022

Do you choose a word of the year? A lot of people choose one to help motivate themselves throughout the year. For example, last year my word was Create. I wanted to concentrate on Creating new relationships, Creating an online community, Creating projects, Creating consistency, etc.

For the last several weeks, I’ve been thinking about it and (unsuccessfully) trying to find a word that would help me for 2022. So, the other day I sat down and started Googling word of the year for ideas. I came across a couple of quizzes to help generate a word for you and decided to give it a try. However, the very first quiz I clicked on wouldn’t let me click past the first question! I kept clicking and clicking and nothing happened! And then it popped in my head … perseverance. I kept trying and trying and nothing was happening - that’s perseverance lol. So that is my new word of the year for 2022!


This word is perfect for me! I am totally going to use this word to motivate me this year. I have so many goals for my life and business, and this word will definitely encourage me!

I’ve been making my own planners the last several years, so I just made the cover for this years. Now I’ll get a constant reminder to persevere lol


Okay, off now to go create signs for my office walls and stickers for my planner to remind me! lol

Have you chosen a word? I'd love to hear it and know how/why you chose it! Comment below and tell me.

Until next time ...

XOXO
Dawn


Monday, January 17, 2022

Baby Onesie's & Toddler Tee's

I don't know about you, but I tend to go in spurts with my crafting. Not only do the spurts of crafting differ in time space (meaning how often I craft) but also in types of crafts. There are periods of time when I make tons of cards with Stampin' Up! products. Then there are periods of time when I make various paper crafts. And then there are periods of time when I use my Cricut. Well, let me tell you ... this has been a Cricut period lol. I feel like my Cricut has been going non stop since the end of November! I've been making tons of Christmas gifts and decor using my Cricut! 

One of my favorite (& quickest!) projects are iron-ons. I love that I can create a design, cut it out and iron it on a piece of clothing in a matter of hours! These are great if you need a quick, last minute gift!

I have a new granddaughter that I've been wanting to make some onesies for, and what better time than Christmas?!! I had a package of 5 onesies so I came up with 5 designs. The hardest part was deciding on the designs! I had so many ideas! I guess I'll just have to get more onesies and make her some more lol

Here are the one's I came up with ...


Didn't they turn out soo stinkin' cute?!! And her mom loved them, which is the added bonus lol

Since I ran out of onesies and wanted to make more, I found some toddler tee's in my stash and decided to create designs for them! (It pays so have a stash of extras lol!)  I have a great-niece, great-nephew and a friends little girl that I needed to find gifts for and these were perfect!

I decided to make coloring shirts. So, I Googled 'coloring page' until I found some designs I liked, plus I found some in Cricut Design Space. Here are a couple I used from Google ...


I uploaded them to Cricut Design Space and cleaned them up (removing all of the white spaces) before cutting them out on black iron-on vinyl. I bought some Crayola Washable Markers so they can color their shirts, mom can wash them, and they can color again and again!!
Here's the finished product ...


Aren't they just the sweetest??!! If you're looking for a quick and easy gift, this is a great project.

Thank you for stopping by today! I hope you try this one out. If you do, I'd love to see it. As always if you have any questions, please feel free to comment below or contact me directly ...

xoxo
Dawn


Saturday, January 15, 2022

Scrabble Tiles Wall Art

If you are not familiar with Jennifer Maker, you need to go follow her on Facebook, Instagram and her website! She has some ahh-mazing project tutorials! And they are FREE!! She is such a wonderful teacher and I find a lot of inspiration from her. 

I've been seeing a lot of the Scrabble Tile wall art projects and have been wanting to make one for a long time! Well, Jennifer created a tutorial and I decided to make it! The fact that she includes SVG files for Cricut is simply incredible! You just watch the turorial, download the file and make it! She makes it so easy!! Here's a link to her page ... Jennifer Maker just click on 'Libraries' then get password and enter the library. You can even search for specific projects. Plus she has them all numbered! So for instance, the scrabble tile wall art project is number 270. So you can either search for it, or scroll through the projects until you find it.

After seeing how easy it was, I decided to make one for each of my grown kids. The first thing I did was create a crossword using a list of words. Here's the free program I used ... Create A Crossword Puzzle. I just made a list of names and words and clicked create. You can scramble until you get the layout you want. I kept mine pretty simple. Here's one I came up with ...


Then I went into Cricut Design Space and downloaded Jennifer's SVG file, following her instructions and the crossword puzzle creater to create my puzzle ...


I cut everything out on black vinyl and applied to these wooden squares I found on Amazon ...

After all of the vinyl was applied, I laid out the tiles and snapped this picture to include so they can see how it goes together ...

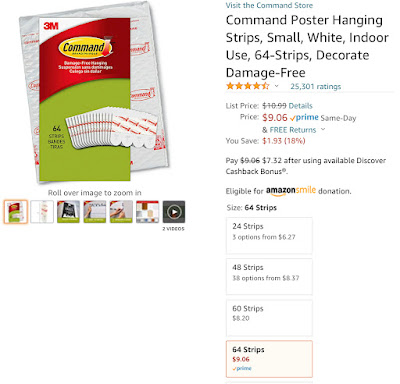
I even included a packet of Command Strips that I found on Amazon to use to attach to the wall ...

I also made custom gift boxes to put them in! If you'd like to see how I made them, here's a link to my blog post ... DIY Boxes


I gave them as Christmas gifts and they really seemed to love them! I hope they do and I can't wait to see them hung up.

Thanks for stopping by today! I hope you enjoy this project as much as I do. If you have any questions, please feel free to leave a comment or contact me ...

xoxo
Dawn


Friday, January 14, 2022

DIY Box Tutorial

Create any size box you need with this easy formula! 

I learned this from Stampin' Up! and thought I'd share. It is so helpful to use to create any size box you need. I made some scrabble tiles for a wall hanging as a gift and needed a box and I came across this method. So, I created this cute box using patterned paper ...

Isn't it just the cutest?!! And it was super easy to make! Here is the formula I used ...

I stacked the scrabble tiles and measured them. I needed a box that was 6"x6" and decided I wanted it to be 2" deep. So, I put those numbers into the formula and cut my cardstock 10"x10", then trimmed a smidge (about 1/8") off of the top and side. Just make sure the sides you trim are connected.
Next, I decided that I wanted the lid 1" tall to be able to see the bottom box sides when closed. I put the numbers into the formula and cut my cardstock 8"x8" - do not trim this piece!

Next, I scored the bottom piece on every end how tall I wanted (2"). I cut a slit on the score lines of 4 sides to create tabs. I did the same with the top piece, scoring at 1" on each side and cutting the slits. Then I added glue to each of the tabs and put them together ...


I placed the scrabble tiles in and they fit perfect!!

You can make a rectangle box also! Just use this formula ...

The possibilities are endless! You can make a set of cards and envelopes and put them in a coordinating handmade box! Absolutely any small gift you need a box for.


Thank you so much for stopping by today! If you have any questions, please don't hesitate to contact me - I love hearing from you!

xoxo
Dawn


Monday, January 10, 2022

Interchangeable Glass Block Decor

One of my most favorite projects is creating a glass block decoration! I've made several over the years and I absolutely love the way they turn out! I've used my Cricut to cut out an image on vinyl and applied it to the glass block, added some lights and a ribbon and voila! Beautiful gift! Here's one I made after my mom passed away. I made one for each of my siblings ...


I wanted to create a few to give as Christmas gifts this year, so I began searching for ideas. Well, I can not tell you how blown away I was when someone (I'm so sorry I forgot who!) posted that she applied the vinyl image to window cling vinyl, not directly to the block! My mind started racing with ideas! So, I came up with the idea to create an image for every month of the year so it can be changed up and the block can be used all year long! The hardest part was deciding on images lol
Here's the products I used ... 

I got the glass block at my local Michaels store

I found this 6 pack of Fairy Lights on Amazon

I bought a roll of Deco Mesh on Amazon to put inside of the glass block


I found this frosted window cling on Amazon

I cut (12) 6.5"x6.5" squares of the frosted window cling to fit the blocks. On Cricut Design Space, I started by adding a 6.5 inch white square on my canvas. Then I searched the image gallery for each months theme and selected the ones I wanted. I sized each image to make sure that they fit inside the square, then hid the square before cutting the image. After each image was cut and weeded, I applied them directly onto the squares of window cling.

Here are the designs I came up with ...

I bunched up some of the deco mesh and a set of fairy lights and stuffed them inside of the block.
I even made a paper cardstock envelope to store all of the clings in lol ...

I ended up making and giving away 3 sets! This project was really easy to make. It was also very time consuming, but totally worth it. I am so tempted to make myself one! Maybe sometime in the future lol!

Thank you so much for stopping by today! I hope you enjoyed this project. If you make one, I'd love to see it! As always, if you have any questions please don't hesitate to contact me ...

xoxo
Dawn