Saturday, December 4, 2021

Cute Little Gift Packaging!

Hello, Hello!

I believe that presentation of a gift is so important! Even if you have a small, inexpensive gift to give, great packaging makes a big difference. Think about it ... would you like to receive an expensive piece of jewelry stuffed into a plastic grocery bag? No! You would love to see it in a beautifully wrapped box lol.

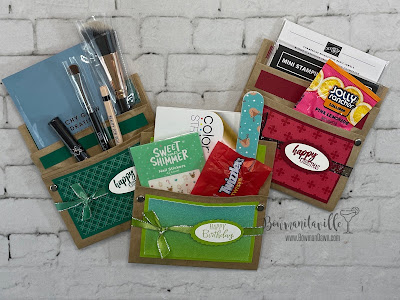
Well it goes for inexpensive gifts too! I have this cute little package idea that's made out of paper bags, scraps of paper, glue, metal fasteners and some ribbon ...


How cute is that??!! I seen this idea a few years ago and bookmarked it. Recently, I was going through looking for ideas for holiday gift packaging and stumbled upon it. So, I made some revisions and additions and came up with a really cute way to give small gifts.

Start off with 2 paper bags. I'm just using regular brown paper lunch bags - super inexpensive lol. Trim off the top end to give a nice even edge (I used my Stampin' Up! trimmer) ...


On the first bag, fold bottom flap up to about 1-1/2 inches from the top, and press a nice crease. On the second bag, fold top down to the flap, then fold the flap up ...


Add a little glue along the bottom of the back and attach it to the first bag ...


Poke a hole in each side of the bags as shown. I used my Stampin' Up! Pick Your Tool to poke through all of the layers. Attach a metal clasp through each hole. If you don't have the metal clasps, I'm sure you can thread some ribbon or string through ...


Now for the fun part - it's time to decorate! Choose your coordinating patterned paper and cardstock. I cut strips of cardstock that are 4 1/2" x 2 3/4", 4 1/2"x1/2" and 4 1/2"x3/4" and a piece of coordinating DSP that's 4 1/4" x 2 1/2". Attach the DSP to the largest cardstock, then attach all to the bag ...

Wrap a piece of coordinating ribbon around the bottom and tie in a simple knot. Trim off ends, if needed ...


I didn't have any coordinating ribbon, so I decided to use Stampin' Blends to color White ribbon so it matched!

Next, I stamped the sentiment and punched it out with the Double Oval punch, then attached it to another punched piece of cardstock ...

I added a couple of dimensionals to the back and attached it over the ribbon ...


Since I sell Color Street nail polish strips (& I have a HUGE personal stash!) I'm gifting a lot of the sets. These make great, inexpensive gift for teachers, neighbors, friends, family, and anyone else that you need a quick gift for! The dollar Tree has many different decorated cellophane treat bags that you could put this in!
You can also use this package idea for so many types of items, and any occasion.  Do you know a crafter? You can stuff this with a bunch of Stampin' Up! items (yes, I sell that too!) How about someone that loves makeup? The possibilities are endless!

You can really fit a lot in there lol …


Thank you so much for stopping by today! If you have any questions, please don't hesitate to leave a comment or contact me. I love hearing from you!

xoxo
Dawn


Tuesday, November 30, 2021

30 Days of Thanks - Day 29

Just my luck! I make a card every single day this month on time and then get behind with only a couple left to do lol

Here’s card 29 (just a day late lol)


I’ll be completely honest here … I totally CASE’d this card from a crafter named Cindy Elam! If you don’t know, that means ‘Copy And Share Everything’. We crafters don’t mind (& actually encourage) when people copy a project! I did change the sentiment used, but this design is hers.

Anyway, I seen the card and immediately knew I wanted to copy it. I’ve been wanting to use the Perfect Borders die set, and this one was just what I needed.

Thank you for stopping by today! If you have any questions please don’t hesitate to contact me.


xoxo
Dawn


30 Days of Thanks - Day 28

I have card number 28 here. The holiday weekend had me all messed up, so it’s a little late lol

This one was easy to make! Typical card bases are cut 8 1/2” x5 1/2” and scored/folded in half at 4 1/4”. This one is cut the same size, but scored/folded at 2 1/8” on each end to fold toward the center. 

I used the colors Daffodil Delight, Highland Heather and Garden Green, along with the Layering Circles die set …

I used the stamp set Peaceful Moments for the sentiment. However, since it didn’t fit in the circle I wanted to use I just cut the stamp. If you decide to do this, just be careful that you don’t cut the letters.

Thanks for stopping by today!
xoxo
Dawn


Saturday, November 27, 2021

30 Days of Thanks - Day 27

 This is one of my favorite designs for a quick and cute card …


This look is simple to achieve! After you cut the layering pieces, you stack the front layer color pieces. For this card, it’s the yellow. Add repositional adhesive to the smallest and attach to the center of the middle yellow. Add repositional adhesive to the back of that and attach the the center of the largest piece. Stamp the sentiment, then the images randomly to cover all pieces. 

Remove from each other and attach with permanent adhesive to the coordinating layers. I hope that makes sense lol!

I used the stamp set Celebrate Sunflowers, and the colors Crushed Curry & Pumpkin Pie …


Thanks for stopping by today! If you have any questions, please don’t hesitate to contact me.

xoxo
Dawn


Friday, November 26, 2021

30 Days of Thanks - Days 25 & 26

Since yesterday was Thanksgiving so I didn’t craft lol, I’m counting this project as 2 days! 


Ohhh myyyy gawwdd (imagine Janice from ‘Friends’ voice lol)

I forgot how much I love making explosion boxes! It’s been a really long time since I’ve made one, but I already have plans for several more lol.

Are you familiar with Jennifer Maker? She is an ahh-mazing Cricut instructor that I’ve been following for years. If you have a Cricut, you should definitely check her out. She shares tons of video tutorials, instructions and a lot of files to upload into Design Space. 

Anyway, I recently seen her video on explosion boxes and decided to make one. My mail lady is retiring and instead of making a card, I thought this would be perfect to wish her luck and thank her for so many years of service.

I had an old paper pad stack that I decided to use as a trial. After making the whole box, I decided I loved it and it’s going to be the gift. The only thing I don’t love is that it’s one-sided paper. Next time, I will definitely use Stampin’ Up! paper because it’s always two-sided.

After everything was cut and sorted, I chose coordinating Stampin’ Up! ink pads to use …


Then I just started folding and gluing everything together! Here’s the completed box …


When you take the lid off, this is what you see … another box!


Take off that lid, and you see … another box!

And take off that lid and … another box!

Take of that lid and … it’s the inside lol. I plan on writing a note of thanks in the center. There’s plenty of room if you’d like to add a small gift or candies.

Here are the little note cards that I decorated with various stamp sets …
Isn’t that just the cutest gift?! I really loved making it and can’t wait to make more!

Thanks for stopping by today! Feel free to leave a comment or contact me …

xoxo
Dawn


Check out my links …


Wednesday, November 24, 2021

30 Days of Thanks - Day 24

Happy day before Thanksgiving!!🦃

I have today’s card ready for you. With all of the cooking going on today and tomorrow, I thought this would be a good stamp set to use …


I started out by stamping and cutting the utensil & bowl images. When I came to putting them together, I wanted the utensils to be ‘in’ the bowl. So I decided to use my exact knife to cut a slit in the bowl …

Then I could slide them into the slit to look like they’re in the bowl. I added a little adhesive to the back to secure them …

I added a 2”x4” strip of DSP to the Crumb Cake front layer. Using the dies from Hippo Happiness, I added the sentiment and bowl of utensils, then attached it to the card.


Thank you for stopping by today! I hope you have a beautiful & blessed Thanksgiving.

xoxo

Dawn


Join Stampin’ Up! and Save on your gift list!

Do you love to craft?
Are you thinking about making your own holiday cards to send out?
Have you considered creating handmade gifts?

If you answered yes to any of those questions and want to save money, here’s your answer …

Join Stampin’ Up! and become an independent demonstrator! Right now you can join Stampin’ Up! for just $75 (normally $99)!!! For that $75, you can pick $125 worth of product from any current catalog! You choose your product! If you want all Cardstock, or just ink pads, or you’ve had your eye on some stamp sets … you get to choose what you want!

That’s $125 worth of products for just $75 (+ tax) and you get FREE shipping!! PLUS as a Stampin’ Up! Demonstrator, you’ll get so many perks! 

  • a 20% discount on future purchases! 
  • Access to new catalogs and products before they’re made public
  • Earn host rewards with your own purchases
  • Become part of an amazing team! My team leader, Robyn Cardon, has graciously opened up her Facebook group of Pink Stampers to her indirect team members. That’s her team members (me) AND their team members (you!). This group is so fun and inspiring! It’s a great place to hang out, there is so much training and challenges.

You can pick out products in your starter kit to create gorgeous cards, gifts, gift packaging, home decor … the possibilities are endless! Check out some beautiful projects created by fellow Stampin’ Up! demonstrators  …


Aren't these amazing? You can make these projects too! If you'd like more info on joining this wonderful family of Stampin' Up! demonstrators, please don't hesitate to contact me.
xoxo
Dawn