Wednesday, February 28, 2024

I'm Making Homemade Dog Food

Sometimes I feel like I'm doing something wrong with raising my dogs! It seems like almost every dog I've had, needed some sort of special diet. Either from allergies or illnesses, I've had to cook for them! I've even had to make homemade treats for one of my dogs! Pumpkin Biscotti he absolutely loved, but was soooo time consuming to make. Here's my Hogan (he passed away at age 9 years), who developed food allergies and would get terrible ear infections from store-bought treats ...

A few months ago, my vet told me that my Paisley was overweight and I needed to change her diet. Now mind you, just 2 short years ago when Margo was a puppy I was told she had food allergies that were causing her failure to thrive. The food she was eating was going right through her instead of absorbing into her system. She was constantly hungry, had diarrhea, ate the other dogs poop all the time and wasn't gaining any weight. I went through soooo many dog foods trying to find something that helped. After numerous brands and products, I finally found one that worked and all 3 of my dogs have been on it since. These are my 3 current furbabies (Paisley age 3, Chesney age 7 and Margo-Rita age 2) ...

Now, my vet was telling me I had to change Paisley's diet, so initally I shrugged it off. However, the last couple of weeks I finally admitted that she was overweight and I started looking into healthier food. Well, that 'fresh food' that we keep seeing advertised? Yeah, that would cost me over $200 A WEEK!! for all 3 of my dogs. If I only order for Paisley, it would be over $60 a week. I figured I'd try homemade first.

I remember my vet explaining that most dry dog food is made up of mostly carbs, which causes weight gain. He suggested that I cut her dry food down from 1.5 cups a serving to 1/4 - 1/2 cup, add 1 cup of leafy vegetables, and 1/4-1/2 cup meat protein. I remember laughing at the time imagining feeding my dogs a handful of lettuce.

But I decided to give it a try. I checked my freezer to see what meats I had on hand. I ended up grilling 1 pound of hamburger, a boneless porkchop, a boneless chicken breast and 1 pound of liver and chopped it all up. Then I steamed some sweet potatoes, spinach and green beans, and chopped them all up. I grabbed some baggies, measured out about 1/2 cup of meat and 1 cup of veggies. I only used about half of all the meat when I ran out of the veggies and came out with 7 servings. Which if I only feed Paisley this, would last 3.5 days. I added 1/2 cup of dry dog food at feeding time and she loves it! I also added a little spoonful to the other dogs dishes and they love it too!

Today, I decided to try a new (hopefully cheaper and longer lasting) recipe. I took the leftover chopped up meat, a container of fresh Spring Greens and some frozen berries. I know, the berries are added sugar, but it's all I had lol. I chopped everything up, measured them out and came up with 12 servings! That sounds much better to me lol. I'll be starting Paisley on this new diet tomorrow, so hopefully she likes it. The vet had suggested adding a little bit of beef broth if she doesnt like it, so I'll try that when I mix in her dry food if needed.


Funny side note ... today is Wednesday, I just started Paisley on the new diet on Sunday night. The hubs was laying on the couch, petting Paisley last night (Tuesday night - so only 3 full days on the diet) and says to me "Do you think she lost any weight yet?" I just kinda looked at him dumbfounded and said "If she did, we need to eat this diet too!"

Have you ever made dog food? I'd love to hear your story. And if you have any recipes, I'd love to try them out! Feel free to share below, or add them to my Facebook page (link below).

Thanks so much for stopping by today! Here's a picture of Paisley as she is now at 88 pounds. Hopefully she'll be a lot thinner and healthier the next time I share a pic of her ...

xoxo
Dawn


Saturday, February 10, 2024

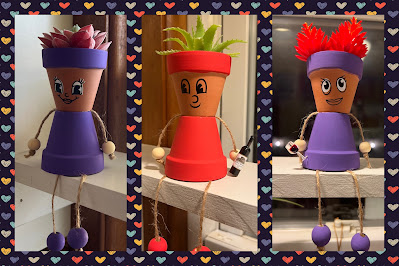
Mini Pot People Shelf Sitters

Here's one of my latest craft projects ...

It all started by winning this box of pots at an auction for $4 … it’s a box of 48 2-inch terra cotta pots. I looked it up on Amazon and they go for around $20.

My first thought was to add succulents to a few and put them on my little kitchen shelf the hubs recently made me. However, this is how my brain works …

----> potted succulents  ----> painted pots for succulents ----> pot people! ----> pot people with succulents for ‘hair’ ----> my kitchen is wine themed - pot people with wine!

So that’s when I began searching my craft stash to see what I had. I found the paint, paint brushes, twine, and wooden balls. Then I went on Amazon and found fake succulents and mini wine bottles & glasses (I put a link to everything below)


I began by painting the pots. I envisioned stacking the 2 pots with the smallest end of each together to form the head and body, and adding a succulent for the ‘hair.’ So I painted one pot completely to create the clothes, and the other I just painted the top rim. (2 coats of paint)

While those were drying (& because I’m terrible at drawing/painting) I went to my Cricut Design Space and created faces out of permanent vinyl. When the paint was completely dry, I added the faces to the pots ...


I attached a small wooden ball to twine, fed the twine through the painted pot and attached the larger wooden ball. I repeated that to create the hands and feet, adding a dab of glue to hold. Making sure the twine was in place, I used glue to add the pots together. Once the glue was dried, I added some small fish tank gravel to the top pot and added a succulent. 


List of items ...

Found on Amazon

  • 2-inch Terra Cotta Pot (2)
  • Twine
  • Assorted Acrylic Paints
  • Wooden Balls - 2 small, 2 large (I just picked 2 sizes I thought would work)
  • Small Gravel (I had fish tank gravel on hand)
  • Mini Wine Decorations
  • Glue (I used e6000)
  • (optional)Cricut Explore 2
  • (optional)Cricut vinyl

**Of course, if you're able to paint/draw you don't need a Cricut. You can just paint the faces on.

And that's it! Thanks so much for stopping by today! If you create pot people, I would love to see them! Feel free to post them on my Facebook page (link below). And of you have any questions, please don't hesitate to ask.


Until next time!
xoxo
Dawn

Click HERE for all my links


Thursday, February 8, 2024

My Fairy Rock Garden

My fairy rock garden! I absolutely love it and can't wait to create it again this coming Spring. 

Have you ever created a rock garden? Or a fairy garden? I've been wanting one for years! A couple of years ago, I finally gathered a bunch of miniatures and created a fairy garden in front of my house. The hubs and I had created a flower bed along the front of the house years before, that I had my Lilac and Peony planted. I always put my large fountain there and added big pots of flowers.
I had a bunch of gift cards for Michaels Craft Store, so I bought some miniatures and supplies from there. I also used some bird houses that I had collected to create little houses for my fairies and gnomes. Here's what it looked like ...
I absolutely loved how it turned out! However, by Fall I realized that I was hardly out in front of my house to fully enjoy it. Most of my time was spent on my back deck and in my backyard. As I gathered everything up to put away for the Winter, I decided that the next Spring I would find a place to create one in my back yard.
The following Spring, we were doing some yard work and decided that I wanted to dig up my hosta plants that I had in front of my back deck. They had become so ever grown, and I just didnt want them any longer. 
The moment the hostas were cleared out, I knew this would be the new home for my fairy garden!
I spent the next several days designing it in my head. In the meantime, we were putting up a privacy fence along our back property line. While digging the holes for the fence posts, we came across many (many!) rocks of all sizes. I began stacking the ones I wanted to keep 'for something'. The hubs just laughed and rolled his eyes at me and my obsession with saving rocks. As my pile grew, it dawned on me - A rock garden! And that's how I came up with the idea of my Fairy Rock Garden.

I started by adding pea gravel for the base ...

My old 'rock' fountain was perfect to add, and we found the gorgeous garden fencing (with a gate!) at our local Menard's (home improvement store) ...

I then began adding, stacking, and arranging my rocks. I picked out small pots from my collection and planted some small plants and flowers to add ...

I really had no set design, so I just kept adding, stacking and arranging/rearranging the rocks and plants until they fit ...
I added my birdhouses, fairies and miniatures. My grandchildren came over one day and painted some of the rocks as a little craft project, so I added them in. The grandchildren now search for cool rocks when they're out and they bring them to me to add to our garden lol
I was really sad last Fall when I had to take it all apart and pack it up for the Winter. But I am sooo looking forward to creating a new one this Spring. Fortunately we don't have to wait too much longer, just 3 more months! In the meantime, I'm on the lookout for new miniatures and decorations (and more rocks!) to add this year.

And again, here's the final garden ...

Thank you so much for stopping by today! Feel free to ask any questions or leave a comment below.

Until next time!
xoxo