Happy Tuesday!!
I have a suuuper easy and really cute card for you today! I think this just might be my favorite card so far in this challenge. And it was soooo easy and quick to put together! If you need several cards at once, I'm certain that you could make a bunch of these in no time!
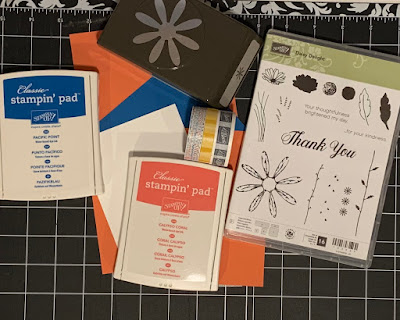
So, without further ado, here are some of the supplies I'm using for this card (a complete list of items, including measurements, will be at the end of the post) …
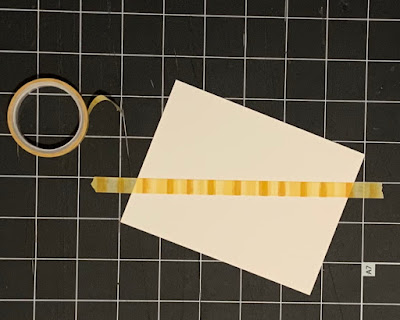
So, to start this card you need to be working on a mat or table top - no paper work surface. We're working with Washi tape and you need to make sure that it doesn't stick to your surface. …
I positioned my Whisper White cardstock on my lined mat. I'm using the lines of the mat as a guide to place the Washi Tape. Line one end of the Washi Tape and run it across the cardstock to the other end, then press down and tear off ...
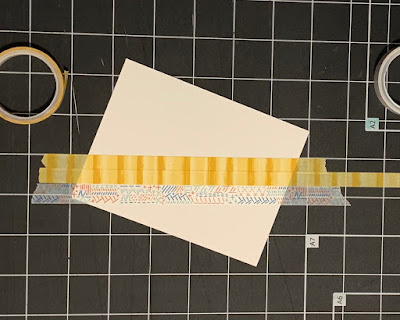
Using the first Washi Tape as a guide, add the second strip. In this case, I added the same tape, arranging so the pattern lined up …
Add the second pattern of Washi Tape, using the previous as a guide. Continue adding rows until you reach the bottom corner. Since this Washi Tape has such a busy pattern, I didn't bother trying to line up the pattern …
Press the Washi Tape onto the cardstock, making sure to get a good rub around the edges and where the rows meet. Then carefully peel it off of the mat …
Since the ends of the Washi Tape were a bit long, I trimmed them down a bit before folding them over onto the back of the cardstock. Then I used my bone folder to really burnish the edges and make sure they were secure, then set aside …
Using Calypso Coral ink, I stamped 2 daisies on the Calypso Coral cardstock. Turn the Daisy Punch upside down to line up the stamped image, then punch out the 2 Daisies …
Add a couple of glue dots to the back of one of the daisies, align it on top of the other and press down …
Use Pacific Point ink to stamp the sentiment on the card front. You can use the punched out daisy as a guide to position, if you want …
Apply adhesive to the back and attach to the Pacific Point cardstock, then attach that to the Calypso Coral card front …
Attach a dimensional to the back of the daisy and adhere it to the card front …
If you'd like, you can attach a piece of Whisper White cardstock to the inside. Calypso Coral is a fairly light color, so it would be easy to write or stamp on if you decided not to add the Whisper White.
And that's it, another card complete! …
Here are the supplies that I used today for this card. I absolutely love this color combination, but you certainly can use any colors you'd like. I'd love to see them, so post your creations to my Facebook page if you do make any - Facebook.com/Bowmanitaville
Don't forget that Stampin' Up! Bonus Days are going on right now! For every $50 (prior to tax & shipping) that you spend on my shopping website in July, Stampin' Up! will email you a $5 coupon to be used in August!! Click HERE to shop.
Thank you so much for stopping by!!
xoxo
Dawn


No comments:
Post a Comment