I’m using the Stamparatus stamp positioning tool with this card. If you don’t own one yet, I would definitely put it on your wish list! Honestly, I have no idea how I survived without one prior to Stampin’ Up! coming out with it! You’ll see in this post just how useful it is.
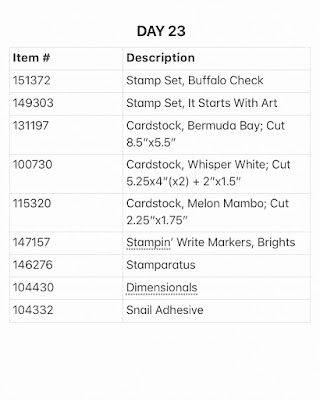
Here are the supplies that I’m using today for this card ...
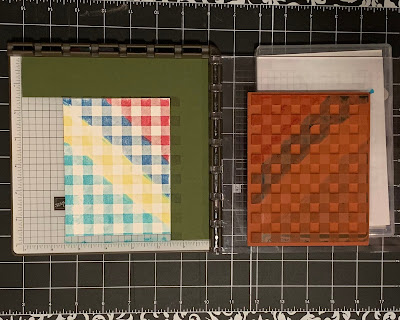
The first thing I started with was the Stamparatus and a piece of Whisper White cardstock. I created a cardstock template to put in the Stamparatus as a guide for the cardstock. This guide positions the cardstock away from the edges, which makes stamping easier.
With the Whisper White cardstock in place, I laid the Buffalo Check stamp over it, making sure it covered the cardstock and lining it up with the grid lines on the Stamparatus. Then I closed the acrylic plate to attach the stamp, and opened it picking the stamp up …
Then I began coloring the stamp with the Stampin' Write Markers. I started with Melon Mambo, then Pacific Point, Daffodil Delight and Bermuda Bay, creating a diagonal pattern. Once I was done, I huffed (breathed on the ink to moisten it) then closed the plate over the cardstock & pressed …
When I opened the plate, I decided that I wanted the colors a little darker. This is where the Stamparatus is a life saver! Since the stamp is already in position, all you need to do is make sure that the cardstock is positioned in the guide. Everything is lined up and ready to reink without worrying that its off center! This is also great if you want to make multiple cards. So I colored the stamp with the markers. This time, I used one color at a time and pressed it on the cardstock …
Once I got the desired colors, I removed the cardstock from the Stamparatus and cleaned the stamp. You can use baby wipes or wet paper towels or a shammy to clean. But since Stampin' Up! inks clean up with water, I carefully removed the stamp and rinsed it in my sink, then patted it dry …
Next, I colored the stamp with the Melon Mambo marker and stamped it on the right side of the small piece of Whisper White. I colored the other stamp with Pacific Point marker and stamped it in the left center …
I applied adhesive to the back, and attached it to the piece of Melon Mambo cardstock. Then added dimensionals to the back …
I put adhesive on the back of the Buffalo Check stamped cardstock and adhered it to the Bermuda Bay card base, then peeled the backing off the dimensionals and attached the sentiment …
I attached a piece of Whisper White to the inside of the card ...
And here's the completed card …
Here is the list of supplies (with measurements) that I used for this card. You can purchase any of these items on my shopping website by clicking HERE
As always, if you have any questions or need help placing an order, please don't hesitate to contact me! Thanks for stopping by today!
xoxo
Dawn


No comments:
Post a Comment