Saturday, August 29, 2020

Swirly Circles Card

Hello, hello!
I have a super fun card for you today! When I seen this technique on a Stampin’ Up! demonstrators group on Facebook, I just knew I had to try it 😊
Here’s what I came up with ...
Don’t you just love it? 😍
Okay, so here’s how I made it ...
I decided to use shades of blue. I used the colors Night of Navy, Misty Moonlight, Pacific Point and Balmy Blue. You can use any colors you choose and this is a great card to make if you have a lot of scraps you want to use up!
These are the products I used (a complete detailed list will be at the end of this post).
The Layering Circles die set has 8 circles graduating in size. So if you number them 1-8 (1 being the largest) I’m using the numbers 1, 3, 5, & 7 - the ones on the left.
I went darkest to lightest, so this is how I cut them out with my Stampin' Cut & Emboss Machine ...
I layered them from lightest to darkest, then darkest to lightest and glued them together ...

Next, I positioned them on my cutter and sliced them in half ...

Take half from each circle. It takes a little playing around to line them up, but you end up with 2 'swirls' for 2 different cards! ...
I set those aside to begin stamping. I decided on using the hippo and sentiment from the stamp set 'Hippo Happiness'. Using Misty Moonlight ink, I stamped the hippo outline full strength onto a scrap of Whisper White cardstock ...
Using the hippo body stamp, I inked it up with Misty Moonlight ink, and stamped onto my work surface to make the ink lighter. Then lined up and stamped over the hippo outline ...
I used Memento Tuxedo Black ink to stamp the face ... 
The Layering Circles Die set also comes with scalloped edge circles. So I used the smallest one to center over the hippo face and cut it out with the Stampin' Cut & Emboss machine ...
I lined up the cut circles on a layer piece of Basic Black cardstock, then used Multipurpose liquid glue to attach. You can use any adhesive, but I like using the liquid to give a little wiggle room to line them up ...
Here's a tip for you ... I always pre-cut a bunch of the front layer of the card (5.25"x4") in Whisper White & Basic Black to have on hand. When I pre-cut them all, I end up with strips that are 1/2" x 8 1/2" and I keep them. They are perfect for sentiments!
So I grabbed one of my strips and cut it to 4". Using Misty Moonlight ink, I stamped the sentiment ...
I added adhesive to the back of the strip and attached it over the seam of the circles ...
I put a couple of Dimensionals on the back of the hippo circle and attached it over the sentiment strip, centering it over the small circle ...

To finish, I used Thick Whisper White cardstock as the card base and attached the Basic Black to the front ...
Ta-daaa ... complete!
Here's another tip ... When I was using the second set of circles for another card, I discovered that you can use a 3 1/2" piece of foam strip, attach to the center of the card layer ...
Then line up and attach the circles ...
Center the sentiment over the foam strip ...
The foam strip makes the sentiment evenly raised since the layered circles are a little thick where the small circles are ...
Here's another card I made using the colors Magenta Madness, Misty Moonlight, Pool Party & Old Olive; and the stamp set "Nothing's Better Than" for the sentiment ...
Here's the detailed list of the products I used. You can shop for them on my shopping website by clicking right HERE
CARDSTOCK MEASURMENTS:
Whisper White, thick ... 8.5" x 5.5"
Basic Black ... 5.25" x 4"
Whisper White ... 1/2" x 4", + scrap for Hippo scalloped circle
Night of Navy, Pacific Point, Misty Moonlight, Balmy Blue ... scraps for circles
Such a cool technique, right? I love it and can definitely see myself making more! The possibilities of colors and sentiment stamps are endless!
I hope you enjoyed this tutorial. If you have any questions, please don't hesitate to contact me.
Thanks for stopping by!
xoxo
Dawn

Wednesday, August 26, 2020

DIY Money Tree

Hello, hello!
I don't know about you, but when I give a gift of money to someone, I have a really hard time of just putting it in a card! I feel like I always have to come up with some creative presentation lol.
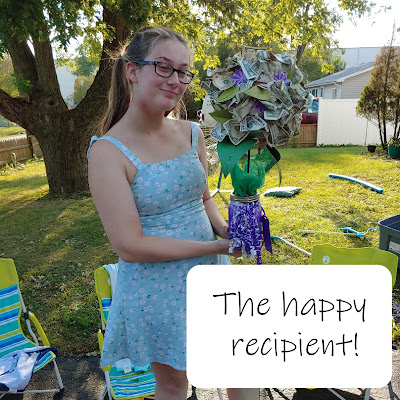
My niece graduated high school this year - woohoooo!! However, because of COVID and the quarantines and limited gatherings, my sister was just recently able to throw her a graduation party. I had seen this idea for a money tree/topiary awhile back and decided to try it myself.
Here's what I ended up with ...
I think it turned out pretty cute! I created a picture tutorial if you'd like to see it, just click HERE
But if you're more into written tutorials, this is how I made it ...
The supplies I used are ... 1 9-inch styrofoam ball, floral pins, floral tape, dowel (I didn't have any, so I used an American Flag yard decoration I had left over from the 4th of July lol), white glue (or you can use Mod Podge), floral foam, a Mason Jar (or any jar/vase/container), party streamers, & curly ribbon
I began by removing the flag from the dowel, wrapped it with floral tape and poked the dowel into the center of the styrofoam ball. Then I removed the dowel and filled the hole with white glue and poked the dowel back in ...
I set that aside to dry and grabbed the dollar bills & floral pins. Pinching the center of the bill, I positioned the floral pin over the center, careful not to poke the bill ...
I then began attaching the floral pins into the styrofoam ball ...
I ended up with some blank spaces that I didn't like. I used some $10 and $5 bills, but if you have more $1 bills, it might fill it ...
I decide to use punches and cardstock to make flowers ...
And I also used my Cricut die cutting machine to cut out leaves ...
Using the floral pins, I attached the flowers and leaves to the spaces ...
Once that was done, I cut 4-5 foot lengths of curly ribbon - I think about 6 of each color ...
 I gathered them together and tied them around the rim of the mason jar. Then using one edge of my scissors, I curled each strand ...
I forgot to take pictures of decorating the mason jar, but all I did was rip strips of a roll of purple party streamer and covered the jar using diluted white glue. I ended up making 3 layers to cover it all.
Once it was completely dry, I stuffed the jar with floral foam, and poked the end of the dowel into the center. I took a sheet of green tissue paper and stuffed it into the jar with the corners poking out ...
All finished ...
I was so happy that my niece was so thrilled to receive it!
I don't know why, but I always worry that my craft projects are dumb or ugly or the recipient thinks it's lame. So I'm really ecstatic when they love it!
I hope you enjoyed this tutorial! If you have any questions, please don't hesitate to contact me. Thanks for stopping by!
xoxo
Dawn

Friday, August 7, 2020

Card using Joseph's Coat technique

Hello, hello!!
Oh boy, do I have a card for you! I absolutely LOVE using this technique to make cards, but I haven't used it in quite awhile. It's called "The Joseph's Coat" technique and it is stunning when finished! It uses one of my favorite Stampin' Up! products - Embossing Powder!!
You can click this link to watch my video tutorial ... TUTORIAL
Okay, so here is the card ...
Yup, it's absolutely gorgeous, if I do say so myself lol. I know, I know - it's not absolutely perfect. But if you know my work, you know that my motto has always been ... Made with love, not perfection. I love what I do. I love crafting. And if things don't turn out perfect, that's okay! That's what makes it hand made and one of a kind!
Here are all of the supplies that I used ...
I started off with a piece of Whisper White cardstock, cut at 5" x 3 3/4". Using Sponge daubers, I randomly added ink to cover it all. Then using stamps from the stamp set Timeless Tropical and VersaMark ink, I randomly stamped all over.
Next, I covered it with Clear Embossing Powder and heat set it. I used Momento Tuxedo Black ink to cover everything, then wiped off the excess ink on the images. After letting it dry for a few moments, I put the card together!
And again - I absolutely LOVE the way it turned out!! I have a link to the video HERE if you'd like to see the tutorial I made.
And here's another card I made, using the same colors and technique, but a different stamp set (Whale Done) ...
So cute, right?! Let me know if you try this technique. Or if you already have, I'd love to see your projects!
As always, if you have any questions please don't hesitate to contact me ...

Saturday, August 1, 2020

Card Using SU's Nothing Better Than Stamp Set

Hello!!
So, in the last post I talked about an all day stamping event my Stampin' Up! team leader put together (you can check it out here https://www.bowmanitaville.com/2020/07/a-new-card.html ...  )
Another of her 'Color Challenge' used these colors ...
And ohhh myyy goshhh!! I love them!! It took me awhile to decide on what to make, even though I kinda picked out the stamp set almost immediately lol. Here's the card I ended up with ...
I am loving this stamp set!! You can also get matching dies (which I have), but I didn't use them for this card. I did use my Stamparatus for the glasses. I used a really easy technique ... You position the stamp where you want the first one, then after stamping you leave the paper and stamp and just move the Stamparatus panel one notch to stamp again. You just repeat until you have your row complete! So super duper easy and everything lines up perfectly!!
If you'd like to try making this card, here are the supplies that I used. You can purchase any/all of them on my shopping website https://dawnbowman.stampinup.net/ ...
As always, if you have any questions please don't hesitate to contact me!
Thanks for stopping by!!
xoxo
Dawn