A few months ago, my vet told me that my Paisley was overweight and I needed to change her diet. Now mind you, just 2 short years ago when Margo was a puppy I was told she had food allergies that were causing her failure to thrive. The food she was eating was going right through her instead of absorbing into her system. She was constantly hungry, had diarrhea, ate the other dogs poop all the time and wasn't gaining any weight. I went through soooo many dog foods trying to find something that helped. After numerous brands and products, I finally found one that worked and all 3 of my dogs have been on it since. These are my 3 current furbabies (Paisley age 3, Chesney age 7 and Margo-Rita age 2) ...
Wednesday, February 28, 2024
I'm Making Homemade Dog Food
A few months ago, my vet told me that my Paisley was overweight and I needed to change her diet. Now mind you, just 2 short years ago when Margo was a puppy I was told she had food allergies that were causing her failure to thrive. The food she was eating was going right through her instead of absorbing into her system. She was constantly hungry, had diarrhea, ate the other dogs poop all the time and wasn't gaining any weight. I went through soooo many dog foods trying to find something that helped. After numerous brands and products, I finally found one that worked and all 3 of my dogs have been on it since. These are my 3 current furbabies (Paisley age 3, Chesney age 7 and Margo-Rita age 2) ...
Saturday, February 10, 2024
Mini Pot People Shelf Sitters
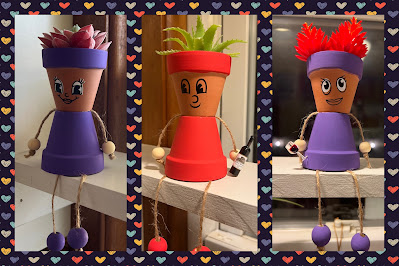
Here's one of my latest craft projects ...
It all started by winning this box of pots at an auction for $4 … it’s a box of 48 2-inch terra cotta pots. I looked it up on Amazon and they go for around $20.
My first thought was to add succulents to a few and put them on my little kitchen shelf the hubs recently made me. However, this is how my brain works …
----> potted succulents ----> painted pots for succulents ----> pot people! ----> pot people with succulents for ‘hair’ ----> my kitchen is wine themed - pot people with wine!
So that’s when I began searching my craft stash to see what I had. I found the paint, paint brushes, twine, and wooden balls. Then I went on Amazon and found fake succulents and mini wine bottles & glasses (I put a link to everything below)
I began by painting the pots. I envisioned stacking the 2 pots with the smallest end of each together to form the head and body, and adding a succulent for the ‘hair.’ So I painted one pot completely to create the clothes, and the other I just painted the top rim. (2 coats of paint)
While those were drying (& because I’m terrible at drawing/painting) I went to my Cricut Design Space and created faces out of permanent vinyl. When the paint was completely dry, I added the faces to the pots ...
I attached a small wooden ball to twine, fed the twine through the painted pot and attached the larger wooden ball. I repeated that to create the hands and feet, adding a dab of glue to hold. Making sure the twine was in place, I used glue to add the pots together. Once the glue was dried, I added some small fish tank gravel to the top pot and added a succulent.
List of items ...
- 2-inch Terra Cotta Pot (2)
- Twine
- Assorted Acrylic Paints
- Wooden Balls - 2 small, 2 large (I just picked 2 sizes I thought would work)
- Small Gravel (I had fish tank gravel on hand)
- Mini Wine Decorations
- Glue (I used e6000)
- (optional)Cricut Explore 2
- (optional)Cricut vinyl
**Of course, if you're able to paint/draw you don't need a Cricut. You can just paint the faces on.
And that's it! Thanks so much for stopping by today! If you create pot people, I would love to see them! Feel free to post them on my Facebook page (link below). And of you have any questions, please don't hesitate to ask.xoxo
Dawn
Thursday, February 8, 2024
My Fairy Rock Garden
I added my birdhouses, fairies and miniatures. My grandchildren came over one day and painted some of the rocks as a little craft project, so I added them in. The grandchildren now search for cool rocks when they're out and they bring them to me to add to our garden lol
I was really sad last Fall when I had to take it all apart and pack it up for the Winter. But I am sooo looking forward to creating a new one this Spring. Fortunately we don't have to wait too much longer, just 3 more months! In the meantime, I'm on the lookout for new miniatures and decorations (and more rocks!) to add this year.
Tuesday, January 30, 2024
Beginners Guide To Stamping
Welcome to the world of creativity and self-expression! If you're a beginner eager to dive into the exciting realm of paper crafting, Stampin' Up! products are your perfect companions. In this blog post, we'll explore the basics and guide you on how to make the most of these fantastic crafting supplies.
Understanding Stampin' Up!:
Stampin' Up! is not just about stamps; it's a comprehensive crafting system that offers a wide array of high-quality products. From stamps and ink pads to coordinating paper and embelishments, Stampin' Up! provides a seamless and coordinated crafting experience.
Essential Supplies For Beginners:
To kickstart your creative journey, gather a few essential Stampin' Up! products:
A. STAMPS: choose a stamp set that resonates with your style. Whether it's florals, sentiments, or geometric patterns, Stampin' Up! has a variety to suit every taste. Stampin' Up! offers 2 different types of stamps ...
1. Cling - the traditional 'red rubber' stamp
2. Photopolymer - stamps are entirely transparent for perfect image placement
Both types of stamps cling to acrylic blocks for easy stamping
B. INK PADS: invest in a few versatile ink pads. Stampin' Up! ink pads come in a spectrum of colors and are designed to coordinate with other products, ensuring a cohesive look in your projects. The flip-open, stackable ink pads store ink upside down and the ink is fast-drying, dye based and acid free.
C. PAPER: explore Stampin' Up!'s beautiful selection of patterned paper and cardstock. The coordinated color families make it easy to mix and match for stunning results. The classic heavyweight Cardstock is dyed all the way trhough, so you won't see any white edges when you cut or tear. And our Designer Series Paper (patterned paper) is acid free and lignin free, making it ideal for all paper crafting projects.
D. TOOLS: basic tools like a paper trimmer, adhesive, and clear blocks for mounting your stamps will make your crafting process smoother. Stampin' Up! offers tried and true tools to make your paper crafting time easier and more productive.
Simple Stampin' Techniques:
Now that you have your supplies, let's dive into some beginner-friendly stamping techniques ...
a. Direct Stamping: ink your stamp and press it directly onto your paper for a clean and straighforward design. Make sure the you use a smooth up and down motion, with no wiggling when pressing onto the paper.
b. Masking: Create depth by masking off areas with scrap paper and stamping over them. Check out this step by step tutorial from an older blog post showing how I stamped on a post-it to use as a mask ... Masking Techique
c. Embossing: add texture and dimension to your projects by heat embossing with Stampin' Up! embossing powders. Here's a great card I created using heat embossing ... Heat Embossed Card
d. Coloring: use Stampin' Up! markers, watercolor pencils, or blends to add pops of color to your stamped images. There are numerous 'outline style' stamps that you can use several colors to color in. Here's an axample of how I used blends to color in a card ... Coloring Example
Stampin' Up! products offer endless possibilities for creativity, making it easy for beginners to embark on their crafting journey. Remember, there are no rules in crafting - just have fun, experiment, and let your creativity flow.
Happy crafting!
Dawn
Thursday, January 11, 2024
Canva InstaGrid Tutorial
Are you on Instagram? How do you post ... randomly? by theme?
I use to just post randomly. Whatever was on my mind or whatever I wanted to share. But awhile back, I found a way to create Instagram puzzle grids in Canva and fell in love with the way it looks!
Here's what my Instagram looks like right now ...
Isn't it pretty?!! As you scroll, it looks like one continuous picture! I just love it so much and I want to share with you how I made it, so I created this pic tutorial ...
To create this in canva, start off by creating a custom design that is 3240x6280 px ...
Once you have the design open, click on 'File' menu and select 'View setting', then 'show rulers and grids' ...You'll see the rulers across the top and left hand side of your design. You can then click and drag the ruler from the top down and position it at the 1080 mark on the left hand side. Once in position, click the ruler again and drag another guide to the 2160 mark. Repeat, adding gridlines at 3240, 4320, and 5400 marks. Click and grab the ruler on the left side of your design and position it at the 1080 mark, repeat for the 2160 mark. When finished, it should have 18 equal boxes and look like this ...The gridlines will not print or appear on your finished picture, they're just to be used as guides. Each of the 'boxes' will be a Instagram post/picture. At this point, I duplicate the page and begin working on the duplicate. The first page I leave blank, so that I always have a clean template that I can just duplicate over and over.Focus on each of the squares as individual pictures/posts and continue to create your design. If you're going to create a few of these, you'll want to make sure they flow together. Duplicate the 'template'. Whatever design elements you have on your created page, add them to the bottom of the duplicated page and line them up so that they look continuous. When you're ready to create another design, use that page as your base and continue same as above. It may sound a little confusing, but this is what mine looks like at this point. I duplicated the snowflake and stars and lined them up at the bottom of the top page. I'll use that page as my next design ...

Tuesday, November 14, 2023
Window Christmas Tree Using Lights
Do you live in a small space? Maybe you don't want to put up a big Christmas tree or deal with all of the ornaments and decorations? Well, here's a great option I found ...
A Christmas tree made out of string lights and put up on a window!
I have a small living room and every year it's a struggle to rearrange furniture to find the best place for our tree. During the pandemic, we weren't going to have many visitors, everyone was 'sheltering in place' for the most part, so I decided it was the best time to give it a try. Plus I had a dog and a new puppy that was getting into everything and I was afraid they would pull ornaments off the tree or knock it down. Here are the culprits at the time, very cute but very mischievous lol Paisley and Chesney ...
I first seen the idea online somewhere - Facebook, Pinterest, I'm not sure. I wish I had the link with the exact details, I'm sorry that I don't. But going from memory, you need Command hooks - clear for windows - 1 large for the top and small ones for the sides, bottom & base, strand lights (depending on the size of your tree, I think I used 100), and optional decorations. I found a plastic metallic star for the top and some red mini garland at the dollar store and I had the red ball ornaments for the base.
I have a bay window in my living room, at the front of my house that I decided to decorate. I used a small Command hook to place the star in the top middle first. Then a large hook right under the star to hold the lights, so it looks like the star is on top of the tree.I positioned the small hooks spaced evenly along the sides and bottom of the 'tree', forming a triangle. I then ran the string of lights from the bottom to the large top hook, up and down to form the tree. For the 'base' of the tree, I positioned 2 rows of 3 hooks to hang the red ball ornaments. Then I added some red mini garland strands across the lights, using the hooks on each side ...
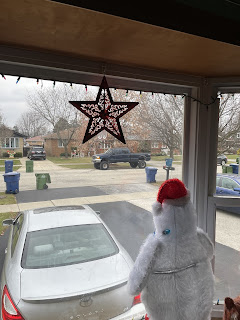
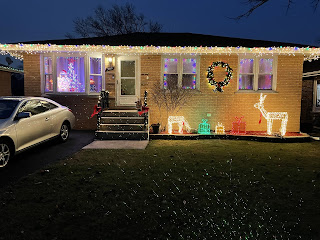
This is what it looks like from the outside ...
I'm so sorry that this is not as detailed as I had originally planned. It's been several years since I've done this and just came across these pictures that I thought I'd share. If you have any questions, please feel free to leave a comment, message or contact me and I will do my best to help you out.


